Thermal Paste Replacement: When, How, and Which Paste
Your CPU might be throttling right now and you'd never know.
Sustained temperatures above 85°C shorten CPU lifespan and tank performance — silently. GGFix watches every sensor (including the hotspot most tools hide) and alerts you the moment a reading drifts above its 30-day baseline, not just when it crosses a static threshold.
Start 3-Day Free TrialNo card requiredThermal paste is the only thing standing between your CPU and its heatsink. When it works, it conducts heat efficiently and your processor runs cool. When it fails — and it will — it acts as an insulator instead, raising temperatures by 10-25°C and pushing hardware toward thermal throttling and shutdown. Understanding when to replace it and how to do it correctly is one of the highest-value maintenance tasks in the PC repair toolkit.
This guide is part of our complete PC temperature reference for all hardware components. If you are seeing CPU temperatures that have risen significantly over the past year, dried thermal paste is frequently the cause — and this is one of the few repairs where a 30-minute intervention returns hardware to near-new thermal performance.
What Thermal Paste Actually Does
The surfaces of a CPU integrated heat spreader (IHS) and a heatsink base are not perfectly flat. Under a microscope, both surfaces are covered in microscopic ridges and valleys. When the two are pressed together, these imperfections create air gaps — and air is an extremely poor thermal conductor, roughly 40 times less conductive than thermal paste.
Thermal paste fills these microscopic gaps with a thermally conductive medium, eliminating air pockets and creating an effective thermal bridge. The paste itself does not conduct as well as metal-to-metal contact would, but since true flat-metal contact is physically impossible at that tolerance, paste is the practical solution.
What happens as paste ages:
- Solvents in the compound evaporate, causing the paste to harden from gel to a powdery, brittle consistency
- Cracking develops from repeated thermal expansion and contraction cycles (each boot and shutdown cycle stresses the paste interface)
- Air gaps reopen as the compound loses its ability to fill surface irregularities
- Conductivity drops — in extreme cases, by 60-80% compared to a fresh application
When to Replace Thermal Paste
The most useful indicator is not a calendar date — it is your hardware's current temperatures compared to its baseline. If you monitored your CPU temperature when the machine was new and have that baseline, compare it to today's readings under identical load.
Clear indicators that thermal paste needs replacement:
| Indicator | What it means |
|---|---|
| CPU temperatures 10-20°C higher than 2 years ago | Compound degradation |
| Thermal throttling on a machine that previously did not throttle | Compound degradation or dust |
| Temperatures spiking immediately under load then stabilizing | Partial paste drying with uneven coverage |
| Machine over 3 years old, paste never replaced | Replace proactively — it has almost certainly degraded |
| After any significant overheating event | Heat accelerates degradation; replace after a thermal crisis |
As a general maintenance interval: replace thermal paste every 2-4 years on heavily used machines (daily workstations, gaming PCs, render nodes), and every 3-5 years on lightly used office machines. After 8 years of repairs, machines that get paste replaced on this schedule consistently run 12-18°C cooler than identical machines that do not — which is the difference between a CPU at comfortable 65°C and one approaching thermal throttle at 82°C under the same workload.
In our monitoring data, we identify paste degradation by watching the long-term trend: a CPU that ran at 55°C idle two years ago and now idles at 70°C under the same ambient conditions is showing the classic degradation curve. Continuous monitoring makes this trend visible; a one-time check never would.
Choosing the Right Thermal Paste
There are three categories: standard non-conductive compounds, carbon-based compounds, and liquid metal. Each has different performance, safety, and longevity characteristics.
Standard Non-Conductive Compounds (Recommended for Most Use Cases)
These are safe for any application — they will not damage your hardware if a small amount migrates to nearby components.
| Compound | Conductivity (manufacturer) | Rated lifespan | Best for |
|---|---|---|---|
| Arctic MX-7 (2025) | Not published | Not yet rated | Newest Arctic; anti-pump-out formula |
| Arctic MX-6 | 8.5 W/mK | 8 years | Reliable, long warranty, good value |
| Thermal Grizzly Kryonaut Extreme | 14.2 W/mK | ~2 years | Peak performance, shorter lifespan |
| Thermal Grizzly Kryonaut | 12.5 W/mK | ~2 years | High-performance standard use |
| Noctua NT-H1 | 8.9 W/mK | 3-5 years | Easy to apply, consistent, forgiving |
| Noctua NT-H2 | 14.2 W/mK | 5 years | Premium non-conductive, longer life |
A note on conductivity ratings: manufacturer W/mK figures are measured by inconsistent methods and routinely overstate real-world performance. In controlled lab testing (Igor's Lab thermal paste database), measured values are typically 30-50% lower than manufacturer claims. The practical temperature difference between any two top-tier standard pastes is under 2°C — correct application technique matters more than product selection.
Carbon-Based Compounds
Products like Thermal Grizzly Hydronaut (11.8 W/mK) and similar carbon-loaded pastes sit between standard and liquid metal in both performance and handling complexity. They are still electrically non-conductive but require more careful application to avoid spreading. Performance is comparable to premium standard compounds.
Liquid Metal (Advanced Use Only)
Liquid metal compounds — primarily gallium alloys like Thermal Grizzly Conductonaut (73 W/mK) and Thermal Grizzly Carbonaut (used as a graphite pad rather than paste) — offer thermal performance that standard compounds cannot match.
Performance advantage: Liquid metal drops CPU temperatures by 10-20°C compared to high-quality standard paste under the same cooler. For extreme overclocking, compact builds, or workstations where every degree matters, this is meaningful.
Critical caveats:
- Liquid metal is electrically conductive. Any contact with motherboard components, capacitors, or the PCB itself causes permanent damage. Application requires complete PCB masking and extreme care.
- Gallium alloys corrode aluminum. Never use liquid metal with aluminum heatsinks or aluminum IHS — common in laptops. Copper and nickel-plated copper heatsinks only.
- Liquid metal is not appropriate for laptops (aluminum components) or for anyone without hardware repair experience.
- In desktop applications with copper heatsinks and experienced application, liquid metal is safe and extremely effective.
For the vast majority of CPU cooler replacements — office workstations, gaming PCs, render nodes — Arctic MX-6 or Thermal Grizzly Kryonaut is the correct choice. Liquid metal is for specific high-performance scenarios with experienced technicians.
How to Apply Thermal Paste Correctly
Application technique matters more than product choice at the same quality tier. Poor application creates air pockets that negate the paste's performance entirely.
Materials needed:
- 91%+ isopropyl alcohol
- Lint-free cloths or coffee filters (avoid paper towels — they leave fibers)
- New thermal paste
- Latex gloves (skin oils contaminate contact surfaces)
Step-by-step process:
-
Power down and discharge — Shut down completely, unplug from wall power, hold the power button for 5 seconds to discharge capacitors.
-
Remove the cooler — Loosen mounting screws in an X pattern (opposite corners) to release evenly. Never pry — if the cooler is stuck to dried paste, twist gently while lifting to break the seal.
-
Clean both surfaces — Apply isopropyl alcohol to a lint-free cloth and wipe the CPU IHS and heatsink base until no residue remains. Let dry completely — typically 30-60 seconds. Do not touch the cleaned surfaces with bare fingers.
-
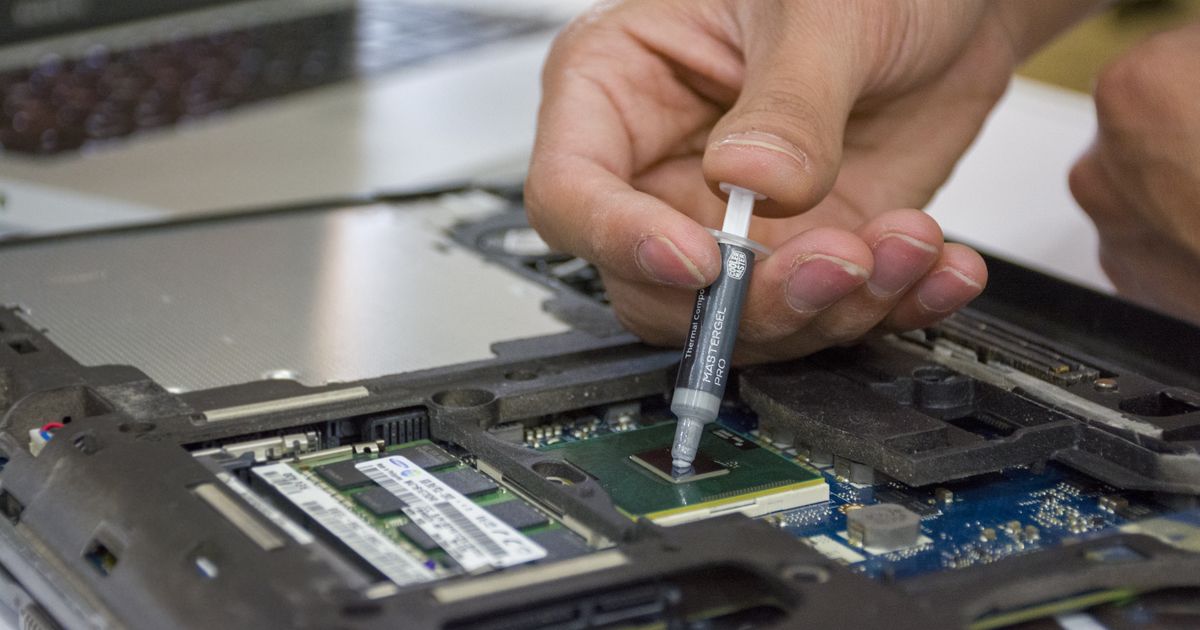
Apply paste — For most desktop CPUs with a flat IHS, a pea-sized dot (~4mm diameter) in the center is the standard method. The mounting pressure distributes it. For larger CPUs (HEDT, Threadripper) or coolers that make uneven contact, an X pattern or thin uniform spread may distribute more evenly — but for standard 65-125W desktop CPUs, the center dot is correct.
-
Mount the cooler — Lower the cooler straight down without sliding. Tighten mounting screws in an X pattern, alternating corners, gradually applying even pressure. Do not fully tighten one corner before moving to the next.
-
Test and verify — Boot the system and run a stress test for 15-20 minutes. Check temperatures. A successful paste application on a standard cooler should show CPU temperatures under load that match or beat the machine's original specification.
Common mistakes that ruin the application:
- Too much paste — excess paste does not improve performance and can migrate to socket contacts
- Sliding the cooler during installation — smears paste unevenly, creating air pockets
- Not cleaning the old paste completely — new paste over old paste does not cure properly
- Touching the cleaned surfaces — skin oils reduce adhesion
- Tightening one screw fully before others — creates uneven contact pressure
The Temperature Drop You Should Expect
Based on our thermal paste replacement data across hundreds of serviced machines:
| Machine condition before replacement | Expected temperature drop |
|---|---|
| 1-2 year old machine, minor degradation | 5-10°C under load |
| 3-4 year old machine, visible hardening | 10-18°C under load |
| 5+ year old machine, paste fully dried/cracked | 15-25°C under load |
| After overheating event (compound heat-damaged) | 12-20°C under load |
A machine showing thermal throttling due to degraded paste almost always stops throttling after a paste replacement — assuming the cooler is adequate for the CPU's TDP. If temperatures remain high after replacement, the next suspect is GPU overheating (on machines where GPU temperatures were also elevated), VRM temperatures (on machines under sustained high CPU power draw), or inadequate case airflow.
Continuous hardware monitoring makes this verification automatic: compare CPU temperatures under identical workload before and after replacement, read from sensor logs. The improvement is quantified rather than estimated.
GPU Thermal Paste: The Often-Forgotten Interface
CPU thermal paste gets all the attention, but GPUs have the same problem — and because GPU die sizes are larger and heat densities are higher, paste degradation affects GPU temperatures faster.
Most discrete GPUs in workstations and gaming machines use thermal paste between the GPU die and the heatsink. After 3-5 years under regular high-load use, this paste degrades just as the CPU paste does.
Signs of GPU paste degradation:
- GPU temperatures that have risen 10°C+ compared to the card's first year of use
- GPU throttling at stock settings it previously handled without issue
- Fan speed running higher than before for the same workload
Replacing GPU thermal paste requires removing the GPU shroud and heatsink — a more involved process than CPU paste replacement, and one that typically voids remaining warranty. For machines out of warranty and showing thermal degradation, it is a legitimate maintenance procedure. The same compound selection applies: Arctic MX-6 or Thermal Grizzly Kryonaut for standard applications.
Frequently Asked Questions
Q: How do I know if my thermal paste needs replacing?
The most reliable indicator is a temperature rise compared to your hardware's historical baseline. A CPU running 15°C hotter than it did two years ago under the same workload almost certainly has degraded paste. If you have no baseline, look for thermal throttling on a machine that previously did not throttle — that is a strong indicator. Any machine over 3-4 years old that has never had paste replaced should be treated as due for replacement.
Q: Does thermal paste brand matter?
Quality matters, but brand within the quality tier does not matter much. Any reputable compound from Arctic, Thermal Grizzly, Noctua, or similar established manufacturers performs within 2-3°C of each other with good application technique. Application quality — clean surfaces, correct quantity, even cooler mounting pressure — has a larger effect than paste brand at the same quality level.
Q: How much thermal paste should I apply?
For standard desktop CPUs with a flat integrated heat spreader, a pea-sized dot (~4mm diameter) in the center of the IHS is correct. Cooler mounting pressure spreads it to the edges. More paste does not improve performance — it creates a thicker layer that reduces conductivity and may spill onto the PCB or socket contacts.
Q: Can I use liquid metal on my laptop?
No. Most laptop heatsinks use aluminum, and gallium-based liquid metal corrodes aluminum on contact, permanently damaging the heatsink. Even on laptops with copper heatsinks, the confined space and the risk of contact with aluminum components elsewhere in the chassis make liquid metal inappropriate for laptops unless you have the exact engineering specs confirming all contact surfaces are copper or nickel-plated.
Q: How long does thermal paste last after application?
Quality compounds from established manufacturers are rated for 3-8 years under normal operating conditions. Thermal Grizzly Kryonaut is rated for "several years," Arctic MX-6 for 8 years, and Noctua NT-H1 for 5 years. Heavy thermal cycling (machines that are powered on and off multiple times daily) accelerates degradation. Machines left running continuously at high temperatures (render nodes, always-on workstations) see faster compound breakdown than machines used for light office work.
Q: Should I replace thermal paste after a PC overheating event?
Yes. A severe overheating event — where the CPU reached or exceeded TjMax and the system shut down or throttled heavily — subjects the thermal compound to temperatures beyond its typical operating range. This accelerates degradation and can cause the compound to partially separate or crack. Replacing paste after any significant overheating event restores the thermal interface to a known-good state and is standard practice in professional repair workflows.
Is your PC throttling under load without telling you?
GGFix watches every temperature sensor — including the GPU hotspot most tools hide — and catches thermal problems before components degrade. AI alerts name which workload caused the spike.
- 3-day free trial — no credit card, 1 machine included
- Installs silently as a Windows Service (2 minutes)
- 50+ sensors + top 25 processes monitored every minute
- Auto-decodes BSODs and Event IDs 41 / 1001 / 219 / WHEA
- AI names the exact app that caused any crash or spike
- Telegram or email alerts in under 10 seconds
| Scenario | Typical cost (USD) |
|---|---|
| CPU/GPU replacement after thermal failure | $400 – $2,500 |
| Emergency technician callout | $120 – $350 |
| Lost workday (thermal throttling undetected) | $200 – $600 |
| Thermal paste + cleaning (early warning) | $30 – $100 |
| GGFix monitoring (per machine / month) | $20 |
| GGFix monitoring (per machine / year — 2 months free) | $200 |
Early warning is the cheapest insurance you can buy. GGFix catches problems when the fix is still cheap — and names the exact app, sensor, or BSOD code responsible.
On-site PC & laptop repair · Copenhagen
In Copenhagen with this exact problem? GGFix fixes it hands-on — often cheaper than replacing the machine.
Fixed prices from 399 DKK for PC cleaning and thermal-paste service, all brands, on-site or drop-off in Ishøj — with an honest diagnosis before you commit to anything.
See PC cleaning and thermal-paste service pricesGGFix Technical Team
Writing about hardware monitoring, fleet management, and keeping machines alive. Powered by GGFix.
Related Articles
GPU Artifacts: What They Look Like and What Causes Them
GPU artifacts range from fixable driver issues to signs of permanent VRAM damage. Here is how to identify which type you have, what temperatures trigger them, and whether your graphics card is recoverable.
PC Maintenance Schedule: The Complete Checklist (Daily to Annual)
The complete PC maintenance schedule for businesses — weekly, monthly, quarterly, and annual tasks with time estimates, environment adjustments, and the real cost of skipping it.
NVIDIA RTX 4060–5090: Temperature Limits by Model
RTX 4090 and RTX 5090 have different temperature limits. The hotspot temperature runs 15-25°C above the core temperature every card reports. Most monitoring setups only watch the core — which means most monitoring misses the actual failure threshold. Here are the exact numbers for every RTX card.
[ free 3-day trial · no credit card ]
Know before it breaks.
GGFix installs in 2 minutes and starts watching your hardware immediately — CPU temps, GPU load, disk health, fan speeds, and 50+ sensors. AI tells you what's wrong before it causes damage.