PC Cable Management and Airflow: What Actually Matters

Your CPU might be throttling right now and you'd never know.
Sustained temperatures above 85°C shorten CPU lifespan and tank performance — silently. GGFix watches every sensor (including the hotspot most tools hide) and alerts you the moment a reading drifts above its 30-day baseline, not just when it crosses a static threshold.
Start 3-Day Free TrialNo card requiredCable management affects PC airflow — but not in the way most guides imply. The honest answer is that one factor determines whether your cables hurt thermals: whether any cable physically crosses the path between your intake fans and your components. Everything else is aesthetics. This guide covers what actually matters, in what order to route cables, and — critically — how to verify the results with temperature data. For a complete PC maintenance schedule that puts cable management in context, see our PC maintenance schedule guide.
Does Cable Management Actually Affect PC Temperatures?
Yes, but the impact depends almost entirely on cable placement, not tidiness. A chaotic cable job that happens to keep all cables away from airflow paths will run cooler than a neatly zip-tied build where the GPU power cable drapes across the front intake fan.
The four mechanisms by which cables raise temperatures:
- Physical obstruction — A cable bundle sitting directly in front of an intake fan reduces the volume of air reaching components
- Turbulence — Cables crossing an airflow stream create turbulent eddies that reduce effective cooling velocity
- Dead zones — Cables packed into a corner trap warm air that cannot circulate back to an exhaust
- Heat soak — Cables in contact with hot components (GPU backplate, VRM heatsink) absorb and re-radiate heat into the surrounding air
To understand the scale of the effect: GamersNexus compared the Corsair 4000D (solid front panel) against its otherwise identical Airflow variant (mesh front panel) in October 2020. Under CPU torture testing, the mesh front panel case measured 9°C cooler. GPU temperature under 3DMark was 3°C lower. The only difference was the front panel material — nothing changed inside the case.
That single case design variable outperforms anything achievable by re-routing cables in an already-built machine. In a typical mid-tower build where cables are not actively blocking a fan, re-routing cables from messy to organized yields roughly 1–3°C improvement, occasionally up to 5–8°C if a cable bundle was sitting directly in front of an intake fan.
The practical implication: if temperatures are your primary concern and you haven't yet chosen a case, pick a mesh-front design first. Then manage cables with airflow — not aesthetics — as the objective.
The One Rule That Matters for Airflow
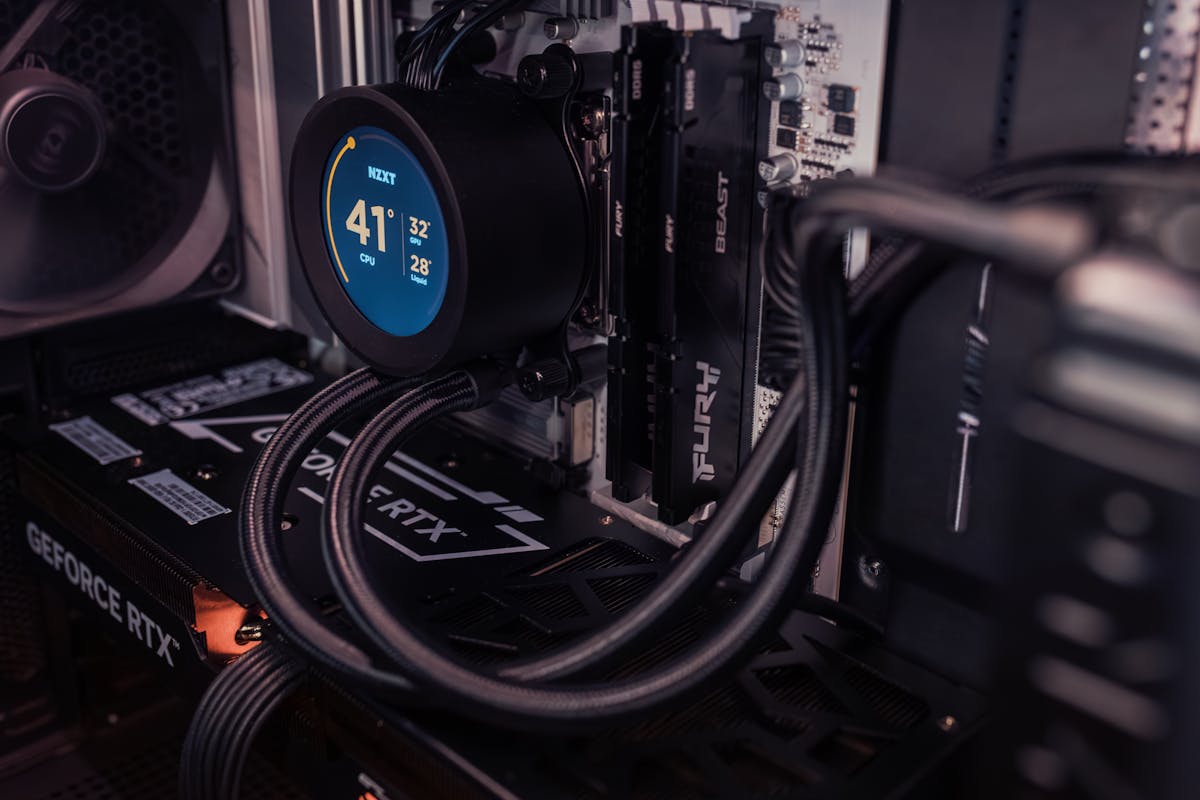
Do not let cables cross the direct airflow path between your intake fans and your CPU or GPU.
That is the only cable management rule that consistently affects temperatures. Everything else — how tidy the cable bundles look, whether you used velcro or zip ties, whether the excess is tucked behind the motherboard tray or left loose inside the PSU shroud — produces minimal or unmeasurable thermal differences.
In practice, two cable runs routinely violate this rule:
| Cable | Common Mistake | Correct Routing |
|---|---|---|
| GPU power (8-pin / 12VHPWR) | Runs from PSU area, drapes left across front intake path | Exit through right-side grommet, route up along the right chamber wall |
| Non-modular PSU unused cables | Bundled and placed in front of intake fans or GPU intake | Stuffed inside PSU shroud cavity or behind motherboard tray |
| CPU EPS 8-pin | Looped and left dangling at the top of the board, crossing intake | Routed fully behind tray, exits at top-left grommet |
| Front panel connectors | Left loose, pooling in front-bottom intake area | Routed into PSU shroud or tied to bottom standoff |
Adding a 120mm fan above a PSU shroud — where warm GPU exhaust air and cable heat soak accumulate — has been measured to reduce GPU temperature by 4°C and increase sustained GPU boost clocks by 15 MHz (Custom PC magazine). The mechanism is the same: reducing the dead-air zone in the lower case chamber where cables tend to accumulate.
Step-by-Step Cable Routing Guide
Route cables in this sequence. Each step creates anchoring points that constrain subsequent runs and prevent the most common airflow violations.
-
Log your current temperatures before touching anything — Run a 10-minute stress test (Cinebench R23 looped, or Prime95 + FurMark simultaneously) and record CPU package temperature and GPU temperature under load. This is your baseline. Without it, you cannot know whether the rerouting accomplished anything.
-
Power down completely and unplug from mains — Press the power button once after unplugging to discharge residual PSU capacitor voltage.
-
Route the CPU EPS cable first — This 8-pin or 4+4-pin cable runs from the PSU to the top-left of the motherboard. Route it entirely behind the motherboard tray, securing it every 5–6 inches with velcro ties. Exit through the top-left grommet. Never loop it over the top of the motherboard — it will sit directly in the CPU cooler's exhaust path.
-
Route the 24-pin ATX connector — Use the center grommet on the right side of the motherboard tray. The run should be straight — no excess coiled behind the board. If you have a modular PSU and the cable is too long, a custom-length replacement eliminates the excess entirely.
-
Route GPU power cables — Exit the PSU shroud through the right-side grommet at the bottom of the motherboard tray. Route upward along the right chamber wall. The cable should enter the GPU from the right, not across the front. This is the most airflow-critical routing decision in the build. For 12VHPWR cables on RTX 4000-series cards, ensure there is no sharp bend within 35mm of the connector — NVIDIA's design guidelines specify this minimum bend radius.
-
Route SATA and storage cables — Use flat SATA cables, not round ones. Flat cables present less cross-sectional area across airflow paths. Route along the bottom channel inside the PSU shroud. Secure in a flat bundle.
-
Consolidate fan headers — Replace individual 3-pin or 4-pin connections to the motherboard fan headers with a single fan hub. One cable run replaces five. Route the hub's single cable alongside the 24-pin run. This cleanup makes the most visible difference to the top and bottom of the case interior.
-
Velcro-tie, not zip-tie — Use velcro straps at every 5–6 inch interval. Velcro is reusable — when you add a storage drive 18 months later, you undo three straps and re-route cleanly. Zip ties that are cut off leave cable jackets notched; over-tightening damages insulation. Reserve zip ties only for permanently routed cables that will never be moved.
For guidance on fan placement and case airflow direction that interacts with your cable routing decisions, see our complete case airflow and fan placement guide.
Tools That Make the Difference
You do not need to spend money to improve cable management, but a few items change the quality of the result significantly.
Velcro cable ties — Reusable, do not damage cable jackets, available in packs of 100 for under $10 USD. The only fastener worth using for cable bundles.
Modular or semi-modular PSU — Removes unused cables from the case entirely. A non-modular ATX PSU in a typical mid-tower build leaves 4–6 SATA cables, 1–2 Molex cables, and sometimes a second PCIe cable permanently attached, all of which must be routed or hidden. A fully modular PSU lets you install only the cables the build actually uses. The thermal benefit is indirect — it prevents the scenario where unused cables end up in front of an intake fan. Expect 1–3°C improvement versus a non-modular PSU with the same hardware, assuming the unused cables would otherwise obstruct airflow.
Fan hub — A single 4-pin PWM hub powers 5–8 fans from one motherboard header connection. Eliminates the cluster of individual fan cables at the top and bottom of the case.
Custom-length cables — Available from CableMod and similar suppliers. Built to the exact length your case requires. Eliminates excess cable slack that must otherwise be tucked somewhere. Most effective on 24-pin and GPU power runs where standard PSU cables are 50–60cm long and many builds only need 30–35cm.
Cable combs — Keep individual wires in sleeved cables parallel and flat. Purely aesthetic when used on runs hidden behind the motherboard tray. Worth using on visible GPU power and 24-pin runs in cases with tempered glass panels.
Cable Management for Office Workstations and Fleets
Consumer cable management guides assume you build the machine once and access it occasionally for upgrades. Office workstations and managed fleets have different requirements.
A workstation that will receive a second SSD in 12 months, or have its RAM upgraded by a visiting technician, needs cable routing that enables fast access — not a permanent zip-tied job optimized for a photo. Velcro at every anchor point, labeled cables on SATA runs, and a documented diagram of what connects where saves 20–30 minutes per maintenance visit across a fleet of 30 machines.
For machines in hard-to-access locations — under desks, in credenzas, in locked cabinets — cable management also affects cleaning access. A machine where cables block access to the heatsink or intake filters takes twice as long to clean and is more likely to be skipped during maintenance rounds. If you are in Copenhagen and a machine is overdue for the clean it keeps getting skipped for, GGFix offers fixed-price PC cleaning and thermal-paste service including tidying the cable runs that block airflow. Our PC maintenance schedule guide covers how to build cleaning and maintenance routines that account for access constraints.
In fleet environments, another factor becomes relevant: cable routing affects how reliably temperature sensors report data. A cable bundle sitting against a motherboard temperature sensor or GPU memory sensor can inflate reported readings by 2–5°C through conducted heat — producing false alerts and unnecessary service dispatches. Keeping cables clear of sensor locations is not just an airflow concern.
How to Verify Your Cable Management Actually Worked
This step is missing from every cable management guide on the internet. You re-routed cables for an hour. Now confirm it mattered.
Run the same 10-minute stress test you ran in step 1 before touching anything. Compare:
- CPU package temperature under load — expect 1–5°C reduction if cables were obstructing CPU cooler intake or exhaust; minimal change if cables were already clear
- GPU temperature under sustained load — expect 2–8°C reduction if a GPU power cable or unused cable bundle was blocking intake; 0–2°C if the path was already clear
- CPU fan RPM at equivalent load — lower RPM at the same temperature is a sign the routing improved airflow efficiency
- System noise level — fans compensating for restricted airflow spin faster and louder; reduced noise under the same workload is a measurable proxy for improved airflow
If post-routing temperatures are within 1–2°C of baseline, the cables were not the thermal problem. The next variables to investigate are case front panel type (mesh vs solid), fan count and placement, and dried thermal paste condition on the CPU. Our guide to hardware monitoring alert thresholds covers the specific temperature ranges that indicate a genuine thermal problem versus normal operating variance.
For fleets, running manual before/after stress tests on every machine is not realistic. GGFix monitors CPU and GPU temperatures continuously — when you re-route cables on a machine and the next 48 hours of telemetry show a consistent 4°C reduction in peak load temperatures, that result appears in the fleet dashboard without any manual logging. If temperatures do not improve after a rerouting visit, the platform flags it, which points toward a case design issue or thermal paste failure rather than cable routing as the cause.
Frequently Asked Questions
Does cable management actually affect PC temperatures?
Yes, but the effect depends on placement, not tidiness. Cables physically blocking an intake fan can raise GPU temperatures by 5–8°C in extreme cases. A typical tidy-up where cables were already clear of fan paths yields 1–3°C improvement at most. Case design (mesh vs solid front panel) produces far larger temperature differences — up to 9°C CPU delta in controlled GamersNexus testing — than cable arrangement within a case.
How much can cable management lower CPU temperatures?
In most builds, 1–3°C under sustained load. In cases where a cable bundle is sitting directly in front of a case intake fan, up to 5–8°C is realistic. Numbers above 10°C that circulate online are not traceable to any controlled benchmark and should be treated as unreliable. For larger temperature improvements, prioritize case airflow design, fan count, and thermal paste condition.
Should I use velcro ties or zip ties for cable management?
Velcro for everything that might need to be moved — which is most cables in a desktop PC. Velcro is reusable, does not notch cable jackets, and can be undone in seconds when adding hardware later. Zip ties are appropriate only for cable runs that are genuinely permanent, such as a fixed-length SATA run that will not change. Over-tightened zip ties damage cable insulation over time.
Does a modular PSU help with airflow?
Indirectly, yes. A modular PSU eliminates unused cables from the case entirely — the main source of cable bulk that ends up stuffed in front of fans. In a build where unused non-modular cables are already well-managed inside a PSU shroud or behind the motherboard tray, the thermal advantage of switching to a modular unit is minimal (1–2°C at most). The real benefit is routing flexibility and time saved on future maintenance.
Can cables touching the GPU cause overheating?
In specific scenarios, yes. A cable resting against the GPU's intake fan vents restricts airflow directly to the heatsink. A cable in contact with the GPU backplate absorbs and re-radiates heat back into the surrounding air. For RTX 4000-series cards with 12VHPWR connectors, ensuring the cable has no sharp bends within 35mm of the connector is also a reliability concern — NVIDIA specifies a minimum bend radius to prevent connector damage under heat cycling.
How do I know if my cable management is hurting airflow?
Run a stress test before and after rerouting and compare CPU and GPU temperatures under identical load. A reduction of more than 3–4°C indicates cables were affecting airflow. If temperatures are unchanged after routing, the problem is elsewhere — front panel restriction, insufficient fan count, or dried thermal paste are the next variables to check. Continuous hardware monitoring makes this comparison automatic: temperature trends before and after any maintenance change are logged and visible without manual testing.
Is your PC throttling under load without telling you?
GGFix watches every temperature sensor — including the GPU hotspot most tools hide — and catches thermal problems before components degrade. AI alerts name which workload caused the spike.
- 3-day free trial — no credit card, 1 machine included
- Installs silently as a Windows Service (2 minutes)
- 50+ sensors + top 25 processes monitored every minute
- Auto-decodes BSODs and Event IDs 41 / 1001 / 219 / WHEA
- AI names the exact app that caused any crash or spike
- Telegram or email alerts in under 10 seconds
| Scenario | Typical cost (USD) |
|---|---|
| CPU/GPU replacement after thermal failure | $400 – $2,500 |
| Emergency technician callout | $120 – $350 |
| Lost workday (thermal throttling undetected) | $200 – $600 |
| Thermal paste + cleaning (early warning) | $30 – $100 |
| GGFix monitoring (per machine / month) | $20 |
| GGFix monitoring (per machine / year — 2 months free) | $200 |
Early warning is the cheapest insurance you can buy. GGFix catches problems when the fix is still cheap — and names the exact app, sensor, or BSOD code responsible.
On-site PC & laptop repair · Copenhagen
In Copenhagen with this exact problem? GGFix fixes it hands-on — often cheaper than replacing the machine.
Fixed prices from 399 DKK for PC cleaning and thermal-paste service, all brands, on-site or drop-off in Ishøj — with an honest diagnosis before you commit to anything.
See PC cleaning and thermal-paste service pricesWriting about hardware monitoring, fleet management, and keeping machines alive. Powered by GGFix.
Related Articles
GPU Artifacts: What They Look Like and What Causes Them
GPU artifacts range from fixable driver issues to signs of permanent VRAM damage. Here is how to identify which type you have, what temperatures trigger them, and whether your graphics card is recoverable.
PC Maintenance Schedule: The Complete Checklist (Daily to Annual)
The complete PC maintenance schedule for businesses — weekly, monthly, quarterly, and annual tasks with time estimates, environment adjustments, and the real cost of skipping it.
NVIDIA RTX 4060–5090: Temperature Limits by Model
RTX 4090 and RTX 5090 have different temperature limits. The hotspot temperature runs 15-25°C above the core temperature every card reports. Most monitoring setups only watch the core — which means most monitoring misses the actual failure threshold. Here are the exact numbers for every RTX card.
[ free 3-day trial · no credit card ]
Know before it breaks.
GGFix installs in 2 minutes and starts watching your hardware immediately — CPU temps, GPU load, disk health, fan speeds, and 50+ sensors. AI tells you what's wrong before it causes damage.